Measuring the wavelengths of the visible lines in the Balmer
series
Method 1
Plug in and turn on the hydrogen discharge lamp.
Hydrogen gas is excited by a current flowing through the gas. Look
at the light emitted by the excited gas through your spectral glasses.
You will see the line spectrum of hydrogen.

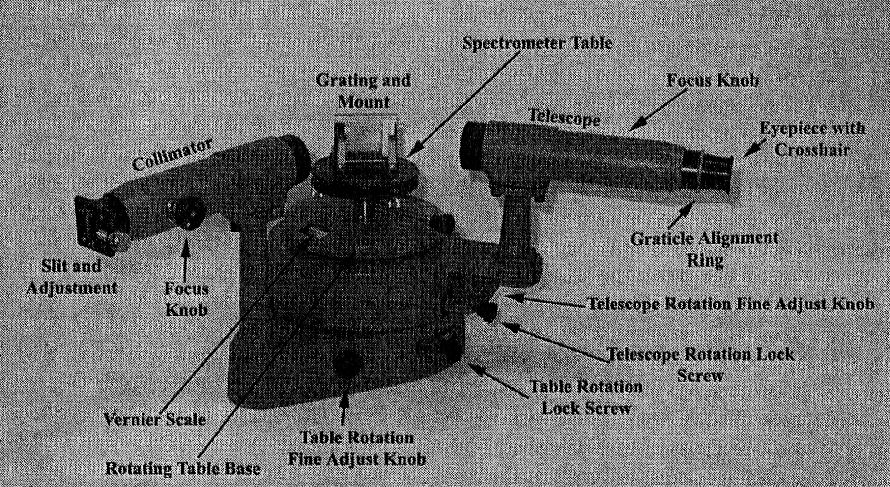
The different parts of the spectrometer are identified in the
figure below.

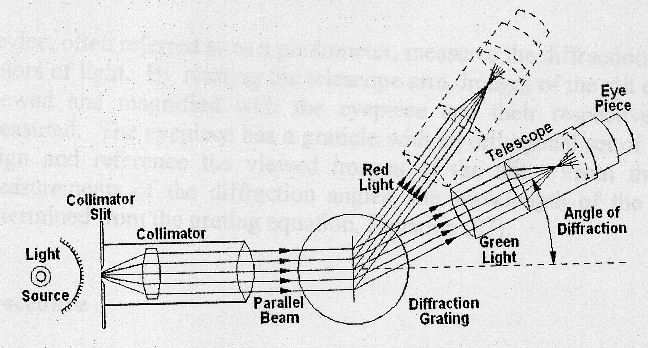
The schematic diagram below illustrates its principle of
operation.

The spectrometer consists of a collimator tube with an adjustable entrance slit, a rotatable
table on which the diffraction grating can be mounted, a telescope
for observing the diffracted light, and an accurate angular scale for measuring
the relative directions of the various spectrometer components. The diffraction grating disperses the light, so that the
relationship between the diffraction angle θ and the
wavelength λ of the light is given by the equation
dsinθ = mλ,
m = 0, 1, 2, ... .
The integer n is referred to as the diffraction order.
For a 300 lines per mm grating d = (1/300) mm.
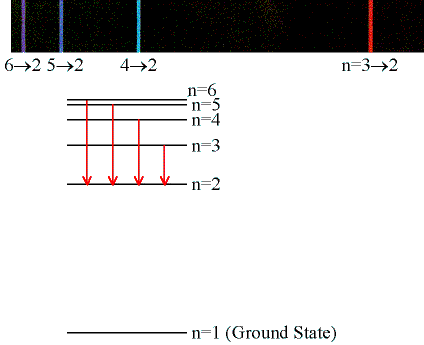
Students will measure the wavelengths for the ni = 3, 4, 5, and 6 lines in the Balmer
series of hydrogen by measuring the angle θ
through which the light of the lines is deflected by the grating in first order
(m = 1) and second order (m = 2).
Procedure:
- Place your hydrogen discharge source approximately 1 cm in front of the collimator slit,
turn it on, and move the telescope
until you can observe the illuminated slit through the telescope. A wood
block is provided, so that the light source can partially rest on the
spectrometer platform.
Caution: HIGH VOLTAGE! Do not touch the
tube, especially near the ends where the electrical contacts are made.
- Adjust the position of the light source to maximize the brightness of the
image. Adjust the slit width so that it is fairly narrow and adjust both
the telescope focus and the telescope eyepiece so that both the cross-hairs
and the illuminated slit are in good focus. Make sure that the slit is
vertical and the cross
hairs are aligned vertically and horizontally. (You can loosen the
alignment ring and rotate the eyepiece.)
- Align the cross hairs with the left edge of the image of the light source.
Tighten the telescope arm rotation lock screw. Then loosen the table
rotating lock screw and rotate the table base until its zero mark lines
up with the zero mark on the Vernier scale. This sets your reference
angle to zero. Tighten the lock screw.
- Place the grating into the grating mount with the grating side of the
glass against the vertical posts. Loosen the
spectrometer table lock screw and rotate the grating so that it is
perpendicular to the axis formed by the collimator and telescope.
Tighten the lock screw.
- Everything should be aligned and tightened down at this point.
- Loosen the telescope arm rotation lock screw, rotate the telescope to view
the diffracted line of interest, align the left edge of the line with the
vertical cross-hairs, tighten the lock screw and read the angular scale,
estimating the angles to the nearest 0.1 degree on the scale. Put the
black cloth over the apparatus to shield the apparatus from stray light.
The nearest division on the main scale is 0.5 degrees, so the estimation
involves 5 equal imaginary increments of 0.1 degree in each division.
- Record your angular readings (in degree) for the violet (6 --> 2),
violet-blue (5 --> 2), blue-green (4 --> 2), and red (3 --> 2) lines into
columns D and E of the linked spreadsheet. This
should be done for the first and second order right and left diffracted
lines. (Note: The grating is strongly blazed. The lines on
one side are much brighter than on the other side. You may not be able
to see all the lines in second order on the weak side.)
Data analysis:


